Managing your billing and reports is an essential part of running your AnswerConnect service effectively. Whether you’re reconciling invoices, checking usage, or extracting call detail for internal reporting, this article gives you an overview of what’s available and where to find it in the app.
Where to Manage Billing & Reports
All billing and reporting tools are located in the AnswerConnect app or web portal.
- Go to Settings in the app.
- Select Billing & Reports to access your billing summary, invoices, usage data, and downloadable reports.

This section lets you both view documents and pull useful reports on your activity.
Billing Basics
Invoice & Charges
Your invoice shows what you owe each month and provides a breakdown of fees, plan charges, and any additional usage charges. The Billing section of Help Centre contains articles that explain:
- Why you might see extra charges on your bill.
- How to download or view a copy of your invoice.
- How to interpret various line items on your invoice.
If you can’t find the details you need on your invoice, AnswerConnect support can provide clarification.
Payment Methods & Setup
You can choose how you pay your bill:
- Auto-pay setup: Enable automatic payments so your bill is charged each month without manual input. Learn how to set up autopay.
- One-time payments: If you prefer to pay manually, here’s how to make a one-time payment.
- Direct debit: Pay each month automatically without card autopay. You can find out more here.
Billing Cycle & Fees
Understanding your billing cycle helps you predict when charges occur and how they relate to your usage:
- You’re billed on the 1st of each month for usage from the previous month.
- If you use autopay, payment is usually processed on the 2nd.
- Your first bill works slightly differently: you pay for your first month in advance. Your invoice for the following month will show no charges, as you have prepaid.
Usage & Minute Tracking
Most AnswerConnect plans are based on minutes:
- You can view how many minutes you’ve used in the portal or app.
- Your unused minutes don’t roll over, but you can change your plan at any time.
- Find out what happens if you go over your plan minutes and how minutes are calculated.
Reports: Extracting & Using Your Call Data
You can download detailed reports for reconciliation, analysis, and business planning.
Call Reports
Call Reports give you:
- Date and time of each call
- Caller phone number
- Duration of each interaction
To generate the report:
- In the app, go to Settings → Billing & Reports.
- Choose the Reports tab.
- Click the Hamburger Icon (three lines).
- Select your desired date range.
- Click Download.
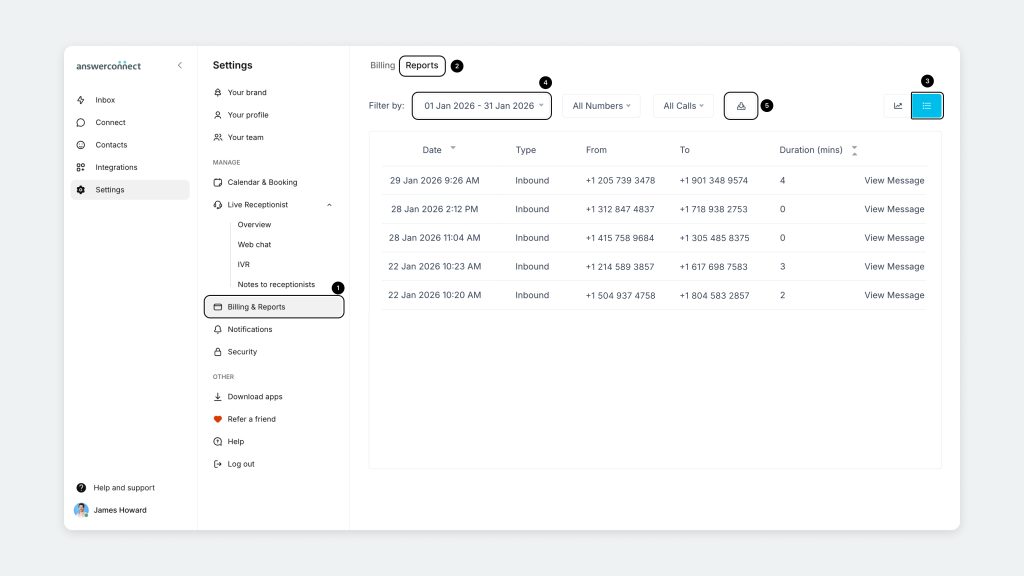
The report arrives as a CSV file, which can be opened in Excel, Google Sheets, or any spreadsheet tool for filtering, sorting, and sharing with your team.

This report helps you monitor call volumes, spot trends (like peak calling times), and reconcile charges if needed.
Other Report Types
Depending on what you need to review, you can download:
- Call lists for specific date ranges: A different export option that gives raw call records with status indicators.
- Usage summaries: Useful if you want a high-level view of minute usage without call-by-call detail.
Each is designed to help you turn raw answering data into actionable information.
Tips for Using Billing & Reports
- Download reports regularly (weekly or monthly) to compare trends over time.
- Share reports with your operations or finance teams to budget for seasonal call volume changes.
Need More Help?
If you’re stuck at any point whether interpreting a price, generating a report, or understanding a usage detail the AnswerConnect support team is available through call, email, or live chat.
US clients: 800-531-5828 | clientservices@answerconnect.com
Canada clients: 800-858-1625 | help@answerconnect.com